The ability to use Regular Expression in the Payslip Import was added in version 4.8.39 of Humanforce.
Overview
When importing payslips from a PDF document, the document is processed to determine which employee each page belongs to. The default approach taken for this process is “brute-force”, meaning the software tests all pages against all employees to find the correct association. This approach can be too slow when used with large PDF files, especially when there are also many employees in the system.
To help with this we’ve added the ability to use a Regular Expression (regex) to read the employee payroll codes directly from each page as an alternative to the brute-force method, drastically improving the processing time for large imports.
Regular Expressions themselves are a large and complex topic. To learn more about them and how they work, check the Wikipedia article. However, to get started there are multiple examples provided in this document which will cover the most common usage cases for payslips.
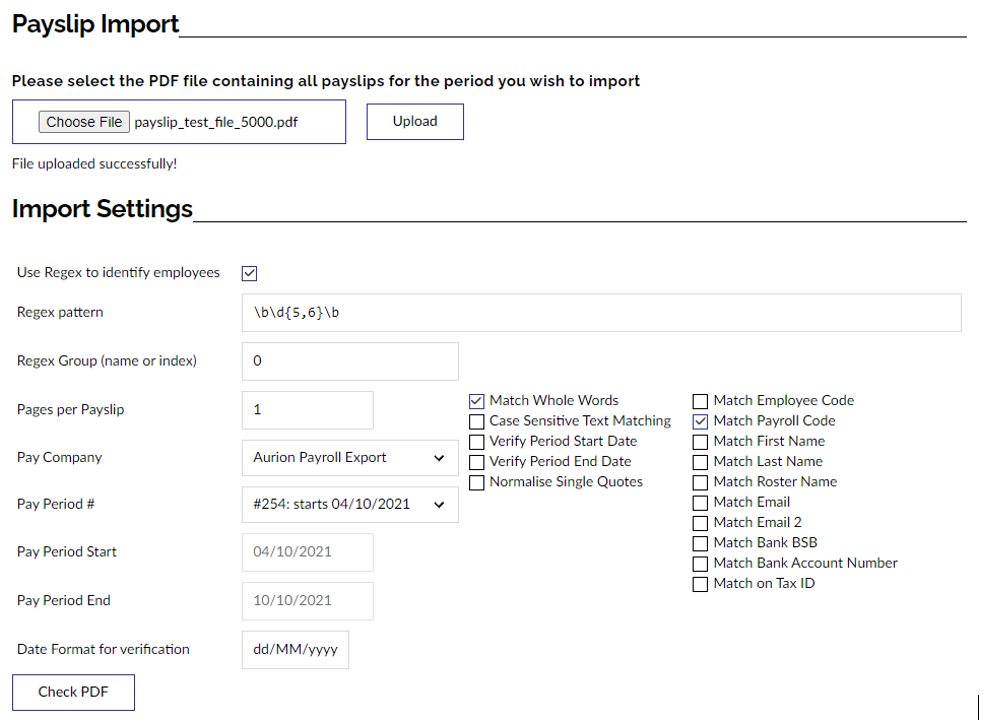
The original processing method is still available and is the default behaviour. To enable regular expression mode, tick the “Use Regex to identify employees” checkbox.
The required regular expression pattern should be entered in the “Regex pattern” textbox. The regex should be designed to capture the employee code or payroll code from the payslip. If your regular expression matches more than just the employee or payroll code (e.g. if you include a field label), use a capturing group to isolate the code from the rest of the match and enter the capturing group’s name or index in the “Regex Group“ field.

How does it work?
When processing the PDF document, the software first extracts all text from each page to get a pure text representation with no formatting. It then iterates through the document and runs the regular expression for every page. If a match is made, it takes text of the matched result from the indicated regex group and uses that to lookup an employee.
By default, employees are looked up by their Payroll Code. However, if the “Match Employee Code” checkbox is selected the lookup is done by Employee Code instead.
If the regular expression succeeds but no employee exists within the selected Pay Company with that code, the current page is ignored.
If there are multiple matches on the page, the first match is used.
When a match is found that successfully links to an existing employee, the page is subsequently checked to ensure that a match would have been found for that employee if the original method had been used. In other words, it verifies that all the other employee data appears on that page, as per the selected checkboxes (e.g. name, email, bank details, pay period dates, etc).
Examples
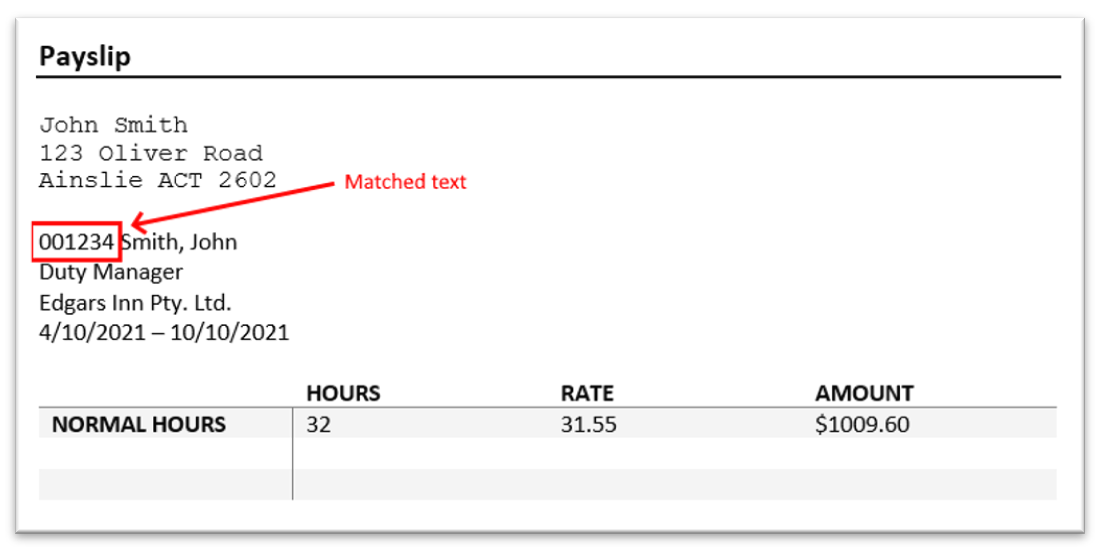
Example 1 – matching via numeric payroll code exactly 6 digits in length
Regex pattern: \b\d{6}\b
This pattern looks for a sequence of exactly 6 numeric digits with word boundaries at either side.

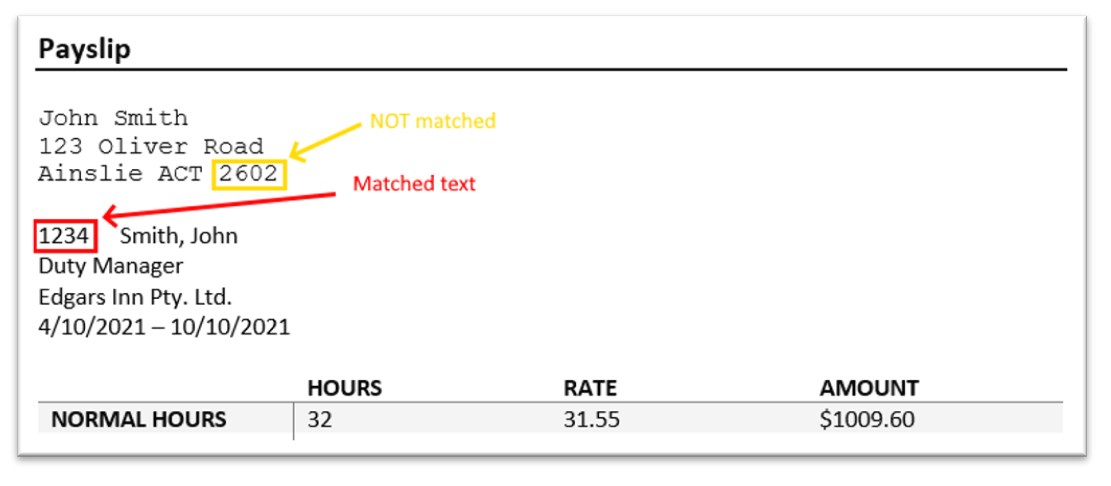
This example works because we want exactly 6 digits, and there would never be any other 6 digit values higher on the page than the payroll code. This approach would not be suitable for 4-digit payroll codes, since it would match the postcode that appears in the address.
Example 2 – matching a 4 digit numeric code appearing at the start of a line
Regex pattern: ^\d{4}\b
This pattern addresses the problem outlined in the previous example. Using the start-of-line token (circumflex accent character) ensures that 4-digit codes are only matched if they appear at the very left-hand side of the document.

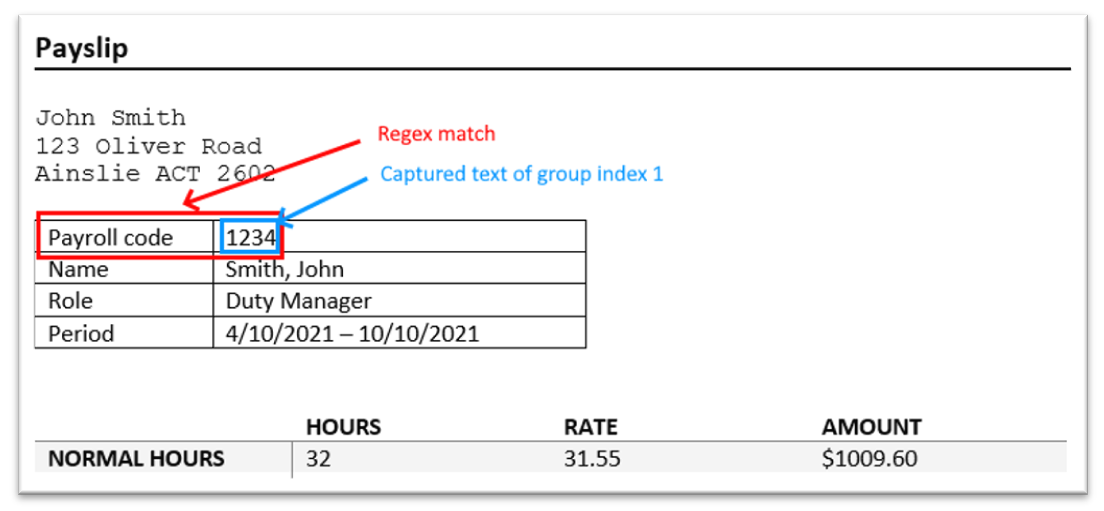
Example 3 – matching any consecutive text that appears next to a field label
Regex pattern: Payroll code\s(\w+?)\b
Regex group: 1
This type of regex is suited to payslips that have a field label next to the payroll code. The pattern first looks for the field label itself (“Payroll code”). It then looks for some whitespace (\s), then captures all characters up until the next word boundary (\b). The parentheses create a capturing group to isolate the actual payroll code characters from the text that denotes the field.

Cheat Sheet
These examples illustrate some common scenarios. Tweak and adapt them as necessary.
Remember that certain characters are reserved and must be escaped if you want to include them as literals, for example in field label text. You can visit the site www.regex101.com to visualise, test and debug your regex patterns. This site breaks down and explains every character in your regular expression, and has helpful examples and documentation.
|
Description |
Regex Pattern |
Group |
|
Numeric code exactly 6 chars in length, anywhere on a page |
\b\d{6}\b |
0 |
|
Numeric code between 4 to 6 chars in length, anywhere on a page |
\b\d{4,6}\b |
0 |
|
Numeric code between 4 to 6 chars in length, only appearing at the very start of a line of text. |
^\d{4,6}\b |
0 |
|
Alpha-numeric code of any length following the field label “Emp#”. In this example there is optional white space between the field label and the payroll code. |
\bEmp#\s*(\w+?)\b |
1 |
|
Alpha-numeric code 6-8 chars in length following the field label “Emp#”. In this example there is optional white space between the field label and the payroll code. |
\bEmp#\s*(\w{6,8})\b |
1 |
|
Alpha-numeric code of any length which incorporates a consistent prefix. In this example the prefix is XYZ |
\bXYZ\w+?\b |
0 |
|
Alpha-numeric code of any length which incorporates a consistent suffix. In this example the suffix is XYZ |
\b\w+?XYZ\b |
0 |